This guide assumes you have created a new identity and a new character and have entered the game.
It will guide your first steps into the world of Lords of the Shattered Kingdom.
Starting point: Just entered the game, after creating a new identity and a new lord. Valid for old players creating new identities as well.
End point: Completing the first quest in the game.
Setting up the workforce
For new players that play the game for the first time, there will be lots of tutorial messages or hints during the course of this guide. You may feel free to follow those, or to just read them and follow this guide.
The first thing you will see when entering the game is this:

This is called the map view. It allows exploration and resource collection, enemy engagement etc.
You can pan the camera by holding the right mouse button down and dragging. You can adjust the camera angle by holding the middle mouse button down and dragging.You can zoom in and out by using the mouse wheel.
The bar up top shows the castle and the lord, and the castle has a small red house icon next to it. It means workers are idling.

To enter the castle, either click on the castle on the main map or on the castle icon in that top bar.

This is the castle view and it shows your starting castle. The camera controls are the same as on the map view.
The tutorial hints tell us to build a house, and that is good advice. Houses will help increase the castle population, which you will see is very important. Regardless of what the tutorial says, click on this slot:

A small popup will appear with the available buildings for that slot. It is only the house:

Click on the house then accept the cost:

Notice how the green transparent house turns into a solid material house.
The house is not yet built however. It will take 2 seasons:

The economy, which includes building construction, of the castle advances in “seasons”. We’ll get back on that later, but for now, let’s visit the other buildings. Open the barracks, by clicking on the icon on the left or on the 3D view. I prefer the 3D view.

A new window pops up, with a lot of stuff in it. Ignore it for now, we just want to assign workers to start training recruits:
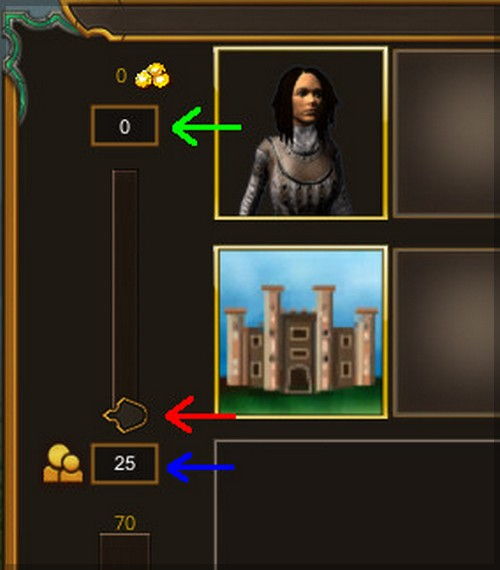
You will find this on the top left part of the window. Drag the slider indicated by the red arrow up until the readout on the field indicated by the green arrow is 10. That means 10 new recruits will be produced each season.
The readout on the blue arrow shows the workers that will be idling in the city:

Notice the gold cost per season of the new setting, indicated by the red arrow. Accept the selection by pressing the check button indicated by the green arrow and then close the barracks window.
Now we need to allocate the remaining 5 idling workers:

Click on the blacksmith, either on its icon on the left panel or on the 3D view. The blacksmith window opens. The blacksmith is used to buy weapons from, but in order to do that, the blacksmith must have stored goods inside. Since this is the start, we have no goods and no workers are producing any goods. We will assign the remaining workers to the blacksmith:
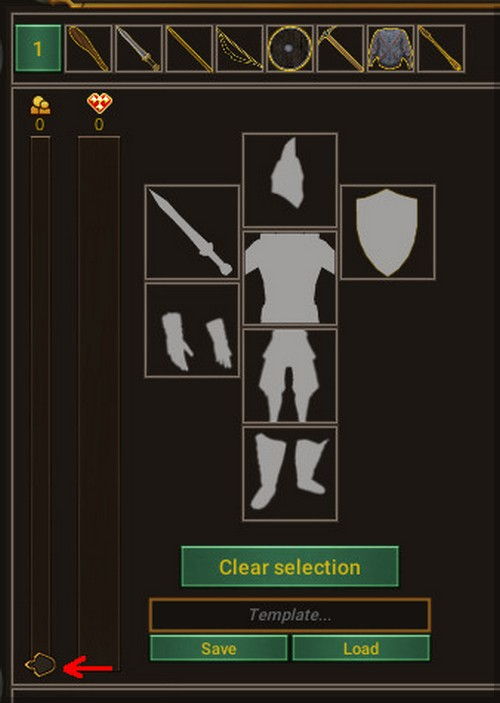
Drag the slider all the way up and accept by clicking on the green checkmark button that appears beneath it.

You can move the mouse cursor over the bar to the right of the slider to see how many goods will be produced each season, how many are stored and what is the storage capacity. Do not forget to click the green button to confirm worker allocation. Now close the window.
Notice now how the red house icon next to the castle disappeared and a new icon showing a resource pile on top of a red circle showed up. It means that the castle will run out of some resource soon. Moving the mouse over that icon shows up how soon that will happen. It says 2 seasons, so it is ok.
It is time to advance the kingdom economy by one season. On the top left side of the screen there is this construct:

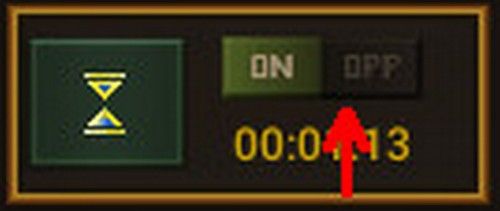
Clicking on the hourglass button will end the current season. Click on it, and notice how instead of the “End season” text there will be a countdown.

Seasons have a minimum length, determined by the number of buildings constructed, number of workers assigned, where they are assigned etc. It is almost always a good idea to end seasons as often as possible, and to make this process easier, you can click on the on/off toggle next to the hourglass button. That will automatically end the seasons as often as possible. Do that now.
You may have noticed that, while you were reading this, those two seasons have passed and the town ran out of resources. Furthermore, there are idle workers, again. You may choose to assign those but i recommend we move on.
Exploring the map
It is time to leave the castle and head out.
*Note: in this stage of the game, no other players can reach you, so there is no pressure!*
Click on the sortie lord button on the top of the left panel in city view:

You should be back on the map view.
Your lord might not be selected (as in the image below), so select it by clicking on its icon on the top bar:

Now, moving the mouse over the 3D view will create a path from the lord to the point where the cursor is at:

Pressing the left mouse button will make the lord travel to that point.
There is a group of 6 resources close to the castle. Pick them up by moving the lord on top of them.
If you do not like the camera auto tracking, you can turn it off by pressing on the little camera button on the lower left side of the screen:

Move around the map with the lord and collect some more resources, but beware of enemies!
If you attacked one by mistake, move forward to the battle section of this guide and then return here!

Attempting to collect the fruit basket inside the red zone will result in you attacking the bandit gang. Do not do this at this point! Just collect the others.
Do not venture too far; do not enter the mountain pass to the right of the castle:

Pickup the resources (and weapon/armor) outlined here and do not forget to also travel north of that area to pickup the resources there also.
To the north\-east of the castle you will find a farm:

Go to it. A popup will appear.

Take the resources and also take control. The farm will produce food and store it inside, even when you are offline, so it is a good idea to visit it from time to time to gather the harvest. Taking control allows you to assign workers from your manor to work in the farm, but that is outside the purpose of this guide.
Continue picking up all the resources. Beware the other bandit to the north of the castle, **do not attack it**.
After you are done, return to the castle:
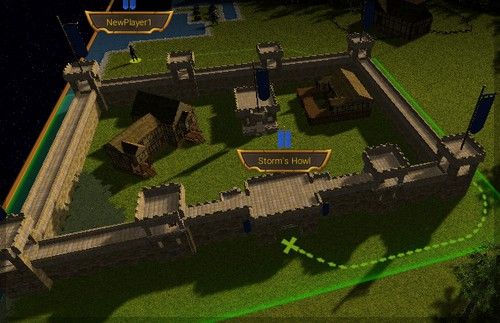
When you get there, a new popup will show:

Let’s drop the goods in the castle first. Press the “Transfer Goods” button.
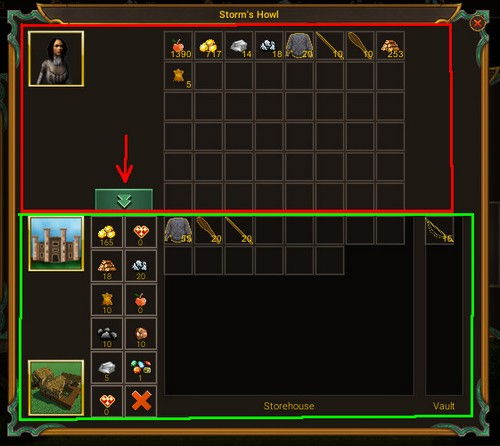
This opens the city warehouse view *(note: this can also be opened from inside the castle by clicking on the warehouse)*. On the top part of the window, it is the lord inventory and you can see what was picked up. On the lower part of the window is the castle inventory, what is stored safely in the castle. You can drag and drop items around, but to make things go faster click on the button indicated by the red arrow to store all items in the castle. Then close the window.
After storing the resources, it is time to recruit soldiers, so click on enter town.
*Note: if you also closed the first window, press space to make the lord “knock” on the castle door again ;)*
Arming the first soldiers
After entering the town, you should be back in the city view.
The red resource indicator should also be gone from the castle icon in the top bar.
Click on the barracks now, to open it. On the lower left side of it, you can notice the bar showing how many recruits there are in the barracks. It is full and there are 70 recruits there *(depending how long it took for you to pick up the resources, there might be fewer)*.
The first step in arming a group of soldiers is to select an empty troop slot.
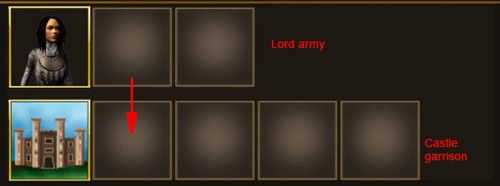
Click on the empty slot indicated by the red arrow.
The big panel in the top right side of the window changes to this:

The equipment of a soldier determines its abilities. There are 7 equipment slots available at this time, and no equipment is selected in any of them.
You must provide at the very least a main hand weapon *(slot with a sword icon)*. Click on that slot to select it. You will get the weapons available for that slot listed to the right:

From the top, the following item categories are listed *(the big icons)*:
* Blunt weapons
* Swords
* Spears
* Axes
Spear soldiers are fast and tanky but have relatively low damage. They are cheap to create and versatile however so we will go with those. Click on the “Spike” weapon from the spears category to equip one.

The character in the picture is now armed with a spear and the stats of the soldiers have improved.
This is enough to recruit a soldier but it is always a good idea to but some armor on the soldier as well.
Click on the main body armor icon.
At this stage of the game, the only “armor” we can provide is cloth armor, but it is better then nothing. Select the cloth armor to equip it. Now the display should look like this:
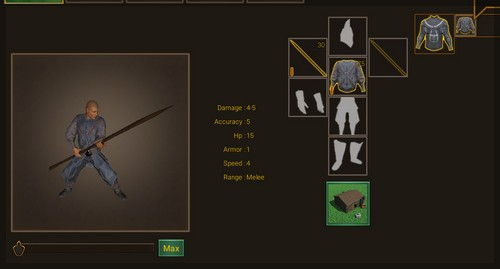
Notice the even further improved stats of the soldier.
To actually equip the soldier, drag the slide below the character to the right, or press the max button to select as many as possible (I suggest you press max).

Now click on the equip button.
Your soldiers are ready and placed in the city garrison.

There are more recruits available however! We just did not have the weapons to arm them!
It is time to build a few more.
The easiest way to do this is to select the slot with the soldiers we just armed.
Now, the same information as before is loaded on the lower right side of the window.
This time click on the blacksmith window icon below the 7 slots:
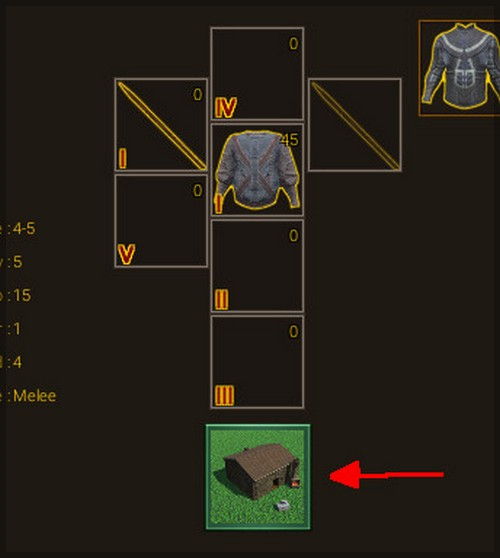
This closes the barracks window and opens the blacksmith window, with the necessary weapons pre\-selected as a set.

You can use the slider and the +/\- buttons to select how many equipment sets you want, but i just pressed the “Max” button and got this:

Red arrow shows how many sets we (had)+(are buying)=(will have).
Yellow arrow points to costs, notice the goods cost.
And finally the green arrow points to the confirm button which you need to press.
Take this opportunity to also assign all the idle workers to the blacksmith. Do not forget to click the green checkmark button to confirm! Close the blacksmith window and now there should be no more idle people in your castle.
Open the barracks again.
Select the slot with the already recruited soldiers.
Click on the max button again, then equip.
The soldier slot now has 40 soldiers. That is the limit of soldiers in a castle with one level 1 barracks. Let’s move some to the lord. To do this, drag the soldiers from the garrison slot to the lord army slot:

At this time, the lord can only command 10 soldiers per troop in battle and only 2 troops. So you should now see something like this:
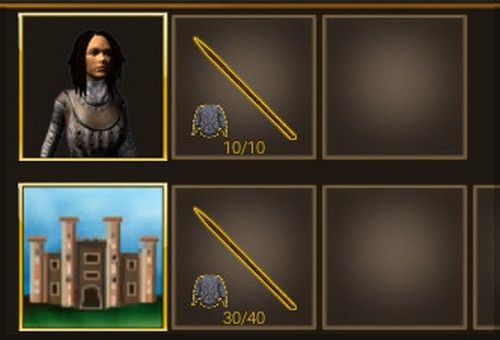
Now drag troops to the other lord army slot also.
You should have 20 soldiers left in garrison.
Click on the garrison slot, and then arm more soldiers with the same equipment, until you have 40 again.
Now, drag the 40 man group on top of the first army slot again.
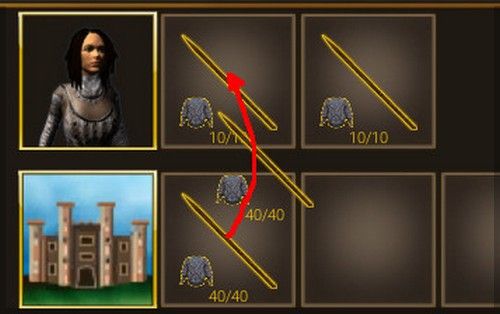
You should now see this:
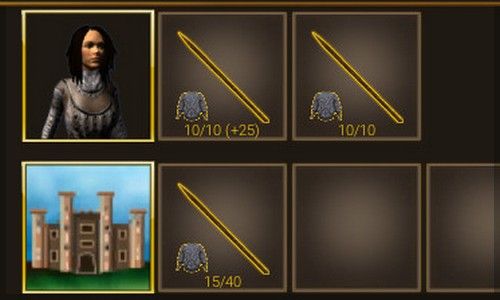
The lord army slot contains 10 active soldiers + 25 more in reserve. The reserve will not fight, but after a fight will replace the fallen soldiers, so that you do not have to keep returning to the castle for more.
Recruit more, and try to do the same for the other lord army slot. If you do not have enough weapons or recruits its fine, don’t wait for them.
Close the barracks window.
You are now ready for the first fight! Sortie the lord and move to the next section.
To battle!
Now that you are on the **map view** again, you should select a skill for your lord to train while in battle. Choosing a magic, command or heroic path is very important but out of the scope of this guide. So, the skills recommended in this guide will be valid choices for either path and you can choose later.
Select the lord, by clicking on the lord’s icon on the top bar.
On the left side panel you can see the army and lord details.

Red arrow shows where the currently training skill should be. Nothing there.
Click the button indicated by the purple arrow to select a **heroic** skill to train.
A new window opens:

Click the button indicated by the purple arrow to focus on training the “Veteran” skill.
Focusing on training a skill makes the training 10 times more efficient, so make sure you have a skill currently focused for training!
Close the skill window and now the lord details panel should look like this:

With that out of the way, head to the south and attack that group of bandits we avoided previously:

The battle is turn based and against non\-player characters it is not timed, so you have all the time in the world.
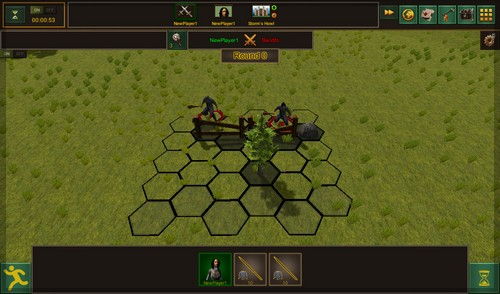
This is the battle view. It looks crowded because I took the print screen at a very low resolution, you should see a much clearer view.
The enemy has already deployed. In my case, I will be fighting two groups of 7 and 6 respectively soldiers. They occupy 2 hexes on the far side of the hex grid map.
Notice also the obstacles on the hex grid. The hexes occupied by those obstacles cannot be walked upon by any unit.
It is time to deploy our forces. In the picture above, the lord is selected for deployment *(notice the green background)*, but you can click on the other soldiers too if you want to deploy them first. I will deploy the lord.
To deploy a unit, you must choose a hex on the side of the field opposite to the enemy. Valid choices will be slightly more gray then regular hexes.
Click on the hex you want to deploy the lord in.

The next group is selected. Deploy the other two units.

After the last unit is deployed, the first round of combat begins.
The fastest unit on the field is selected, that is one of the spearmen.
Move the mouse over the spearman to see its stats again:
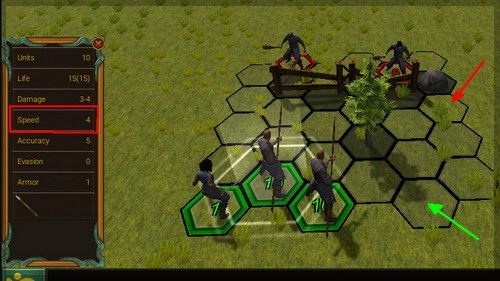
It has a speed of 4. That means it can move 4 hexes *(has 4 action points)*. The hexes in range are slightly more gray then the others. Green arrow points to a valid hex, red one points to a hex that is out of range.
In order to attack, the unit will need to have at least one action point available after it moved. So, the enemy units are out of range.
Moving the mouse over the enemy unit will show that they are slower:
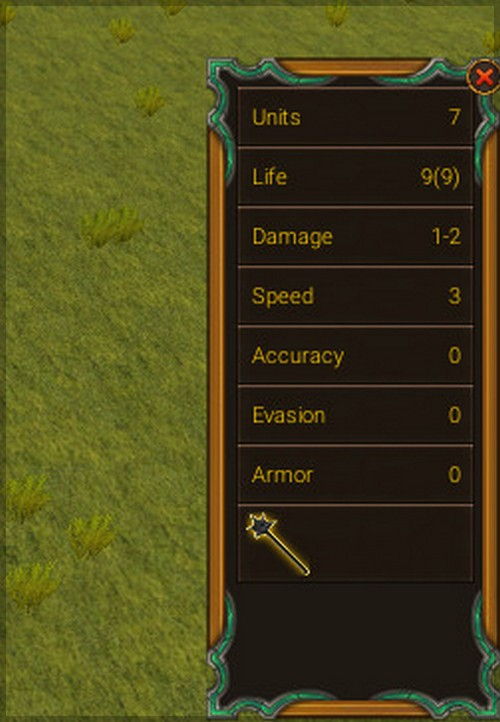
That means, no matter what they do, if we wait we will have the first strike. It is not a good idea for us to approach and allow them the first strike. Let’s wait.
To skip a unit’s turn, click the hourglass button on the lower right side of the screen.
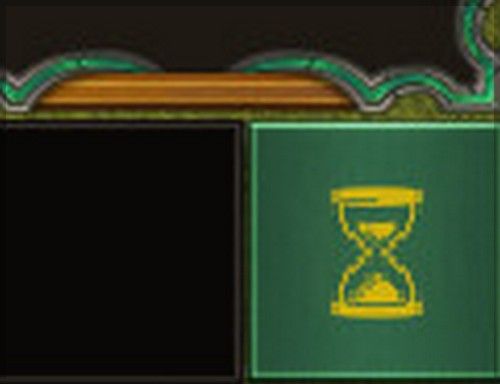
I will skip all units, but you might not need to. If you can hit, do not skip the unit and read on!
After i skipped all my units, the enemy moved. Now it is my turn again:

This time, the enemy is in range. To attack the enemy unit, move the mouse over its hex. Moving the mouse close to a neighboring hex will decide where the attack should come from *(if that hex is available)*
Click to confirm the order. Now the unit moved and attacked:

When a melee unit is attacked by another melee unit it will retaliate. This retaliation happens only once per round, so focusing the same unit with multiple attackers may be a good idea.
Continue fighting until the battle is over and all enemy units are eliminated. If you cannot attack with a unit, just skip it *(I will have to skip my lord and the other spearman for the rest of this fight because of the positioning)*. It should be an easy fight!
After the battle, you will be returned to the map view and the battle report will be visible:

On the left side, your losses and below the list the approximate value of those loses measured in gold, on the right side, the enemy losses. In the middle, you see how much experience you received, how plunder, the experience efficiency etc.
Close the battle report.
Congratulations on winning your first (very easy) battle!
The first quest
Now that the bandits are defeated, we have gained access to the first quest giver in the game, Casian.
Quest givers appear on the main map as huts:

To interact with them, move the army on top of them. They can be interacted with from any side, so don’t worry about that!
Once you reach Casian’s hut, you will get a new window looking like this:

Available quests are listed on the left side, and unavailable quests can also be seen if you expand the “Unavailable Quests” list. However, it is generally a good idea to first complete the story line quests, and then do other quests. So, click on the “How can i help?” text, indicated by the red arrow.
The first quest details are displayed:
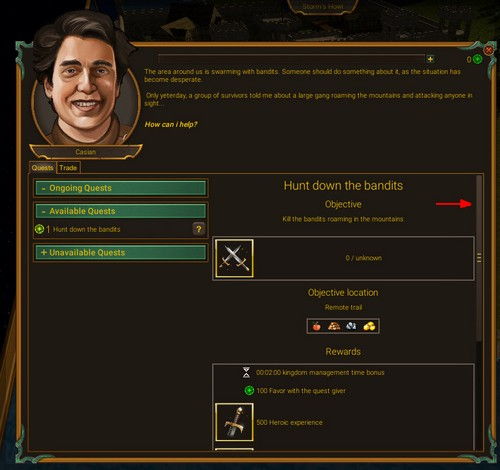
Read the details if you like, and you can also choose another reward resource, but when you are done use the indicated scrollbar to scroll to the bottom and then accept the quest by clicking on the round green checkmark button at the bottom. Basically the quest says you have to kill all enemies in an area.
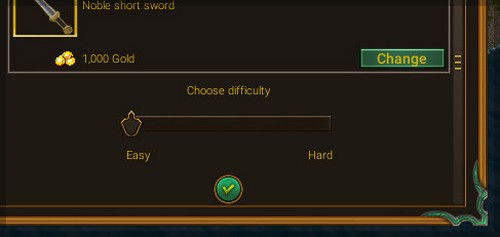
Leave the slider on the easy setting; you do not want a hard quest, especially as a beginner!
Close the window after accepting the quest.
Now, your screen should contain a couple of new things:
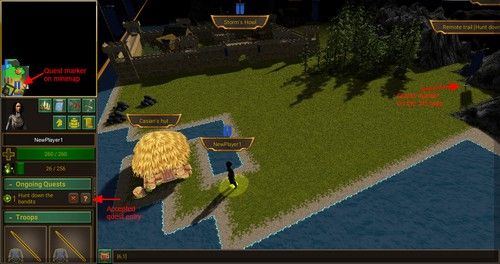
When you accepted the quest, a new object appeared on the main map. It is a quest marker, looks like a flag pole, and traveling to it allows you to go to another area, a hidden area, where the quest action happens.
You have troops ready so, let’s go.
Travel to the quest marker on the main map. When you move your army on top of it, you will get this message:

Basically, it asks if you want to enter the quest area. Click the checkmark button, indicated by the arrow to accept.

The scenery changed, and the ambient music changed. You are now in a quest area. You will need to kill all the bandits on this map *(which is considerably smaller than the previous one)*.
Just attack them one by one and defeat them in battle.
Be careful in battle and not lose your lord. If that happens, you will be moved back to the castle and have to wait at least one season before moving again!
If you need to return to the castle and get more troops, return to the flag pole in the middle of the map.
To see the contents of an enemy group, move your mouse over them and the press and hold the right mouse button. A new window will open and you can mouse over the various members to see what they are using:

And mouse over one unit in that group:

This group is probably the most dangerous of them all!
Good luck!
.
.
.
.
When you have killed all of them, the quest entry on the left side of the screen will change to this:
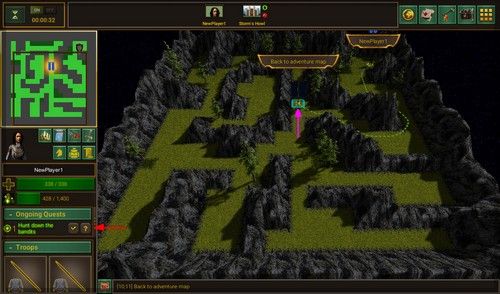
Complete the quest by clicking on the checkmark button, indicated by the red arrow. You will be asked to confirm if you really want to, and you do (since you already picked up all the goodies from the map).
After you complete the quest, head for the quest marker, as indicated by the purple arrow. Confirm exiting the area.
You will return to the main map, and the quest marker will vanish.
You have just completed the first quest!
Remember to visit the castle, drop the resources and get more soldiers!
To get the next quest, head to Casian’s hut again. Once you get there, to get the next quest, click on the “How can i help?” message again.

I expanded the “Unavailable Quests” list. As you can see, there is quite a way to go…and there are 9 more quest givers.
GOOD LUCK!
Credit to NeuralSoft